Takes you through the steps necessary to start the ESAACT 
                  		enterprise server region, access the AACT application running on the region using the Rumba+ Desktop, initialize a VSAM file, and interact with the
                  AACT application. 


            Restriction: This topic applies to Windows environments only. 


               Start the ESAACT 
                  		  enterprise server region


                  - In 
                     			 Eclipse on the 
                     			 Server Explorer, expand 
                     			 Local [localhost:86]. 
                     		  
                  
- Right-click the 
                     			 ESAACT server, and select 
                     			 Start from the context menu. 
                     			 
                     Note: You might be prompted with an 
                        				Enterprise Server 
                        				Sign On dialog box, prompting you to provide connection details for the ESAACT server. This is a standard security dialog box. Click
                        
                        				OK without specifying any sign-on details. Also, if prompted to disable password recovery, click 
                        				No. 
                        			 
                      In the 
                        				Server Explorer, you can see that the icon for 
                        				ESAACT has changed to indicate that the region has started. 


               Start the Rumba+ TN3270 Display


               Initialize the AACTFIL VSAM file


               Before you can run the AACT transaction for the first time, you need to initialize the 
                  		  AACTFIL VSAM file, in which the application stores data. 


                  - On the 
                     			 Rumba Mainframe Display, press 
                     			 Ctrl+Shift+Z to clear the screen. 
                     		  
                  
- Type 
                     			 CFCR AACTFIL, and then press 
                     			 Enter. 
                     			 
                     This loads the VSAM file. 
                        			 
                      
- Press 
                     			 Ctrl+Shift+Z to clear the screen. 


               Run the AACT transaction


                  - Start AACT 
                     			 
                  
-  


                        - Enter 
                           					 AACT. The following shows the initial screen of our transaction: 


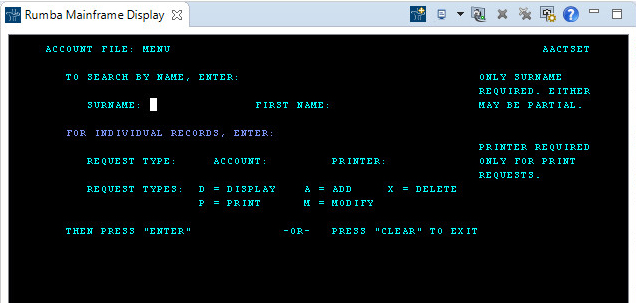
 As you can see from this screen, this transaction lets you display, add, delete, print, or modify information in the file.


- Add a record 
                     			 
                  
- Follow these steps to add a record: 


                        - Tab to the 
                           					 REQUEST TYPE field and type 
                           					 A. 
                           				  
                        
- In the 
                           					 ACCOUNT field, type 
                           					 11111. 
                           				  
                        
- Press 
                           					 Enter. 
                           				  
                        
- Complete the fields on the NEW RECORD screen as follows. Of the three ADDRESS fields, complete only the first two. Fields
                           not represented here are not mandatory so please skip over them. 


                                          | SURNAME | Washington |   
                                          								
                                          | FIRST | George |   
                                          								
                                          | ADDRESS | Mt. Vernon |   
                                          								
                                          |  | VA |   
                                          								
                                          | NO. CARDS ISSUED | 1 |   
                                          								
                                          | DATE ISSUED | 070476 |   
                                          								
                                          | REASON | N |   
                                          								
                                          | CARD CODE | 1 |   
                                          								
                                          | APPROVED BY | ME |  


- Press 
                           					 Enter. 


- Retrieve a record 
                     			 
                  
- Follow these steps to retrieve the record you just added: 


                        - Tab to the 
                           					 REQUEST TYPE field. 
                           				  
                        
- Type 
                           					 D to display a record. 
                           				  
                        
- In the 
                           					 ACCOUNT field, type 
                           					 11111. 
                           				  
                        
- Press 
                           					 Enter. The following display shows the record retrieved from the file: 


- Clear the screen of your TN3270 emulator to return to the main menu, then clear the screen again to exit the transaction.


- You can now stop the enterprise server: in Server Explorer, right-click the 
                           					 ESAACT server, and click 
                           					 Stop. 


- Exit the transaction and the TN3270 session 
                     			 
                  
-  


                        - On the 
                           					 Rumba Mainframe Display toolbar, click 
                           					 Disconnect 
                           					  . .
- Close the 
                           					 Rumba Mainframe Display. 


            This concludes the tutorial.